
You've put on your dance shoes, the music starts, and suddenly your feet seem to have forgotten how walking works. The jive looks full of kicks, spins, and rapid footwork, but those flashy details aren't where a beginner should begin. The dance becomes much easier when you first learn the rhythm, clean weight transfers, relaxed posture, and gentle partner connection underneath the style.
Jive has historical roots that explain its distinctive character. It originated in the United States in the early 1930s within African-American communities, was publicly popularized by Cab Calloway in 1934, and later became a recognized DanceSport ballroom style. That history helps explain its swing-era energy, quick syncopation, and compact six-count structure. (Jive history and technique overview)
What Jive Feels Like on the Dance Floor
The music starts, and your first jive may feel more contained than expected. Your feet rock lightly beneath your body, then move through compact side steps that keep your weight changing with the beat. The dance feels lively because of its timing, not because you must travel far or add large kicks.
Jive is a fast four-four dance with a triple-step feeling. The rock step and two chassés create its light, buoyant pulse. Competitive jive is commonly danced around 176 beats per minute, as described in this DanceSport jive timing and tempo background. Beginner practice can use slower music, roughly 128 to 160 BPM, to build control before increasing speed.
At first, let your feet do less. Keep the upper body upright and calm while the legs work underneath you. Softly flex your knees, lift your chest, and release your shoulders. The bounce comes from controlled knee action and clear weight changes. It should feel like a spring compressing and releasing, not like jumping.

The feeling to aim for
Aim for quick feet, quiet shoulders, and a relaxed face. Kicks, flicks, and spins can wait. A steady rhythm and clean weight transfer will make your dancing look more confident than oversized styling. Your partner should feel gentle, continuous contact rather than sudden pulls or pushes. Keep that connection responsive, like two hands sharing information without squeezing.
If the music speeds up, protect the same foundation. Make the steps smaller, keep the knees soft, and place your weight clearly over the supporting foot. Those plain details give jive its easy, springy quality before you add style.
By the end of this guide, you'll have a practical starting point for counting the basic, placing your feet, holding a partner, correcting common errors, practicing alone, and approaching simple turns. You'll also know when guided instruction can replace guesswork with clearer feedback.
The Six-Count Basic Step and Timing
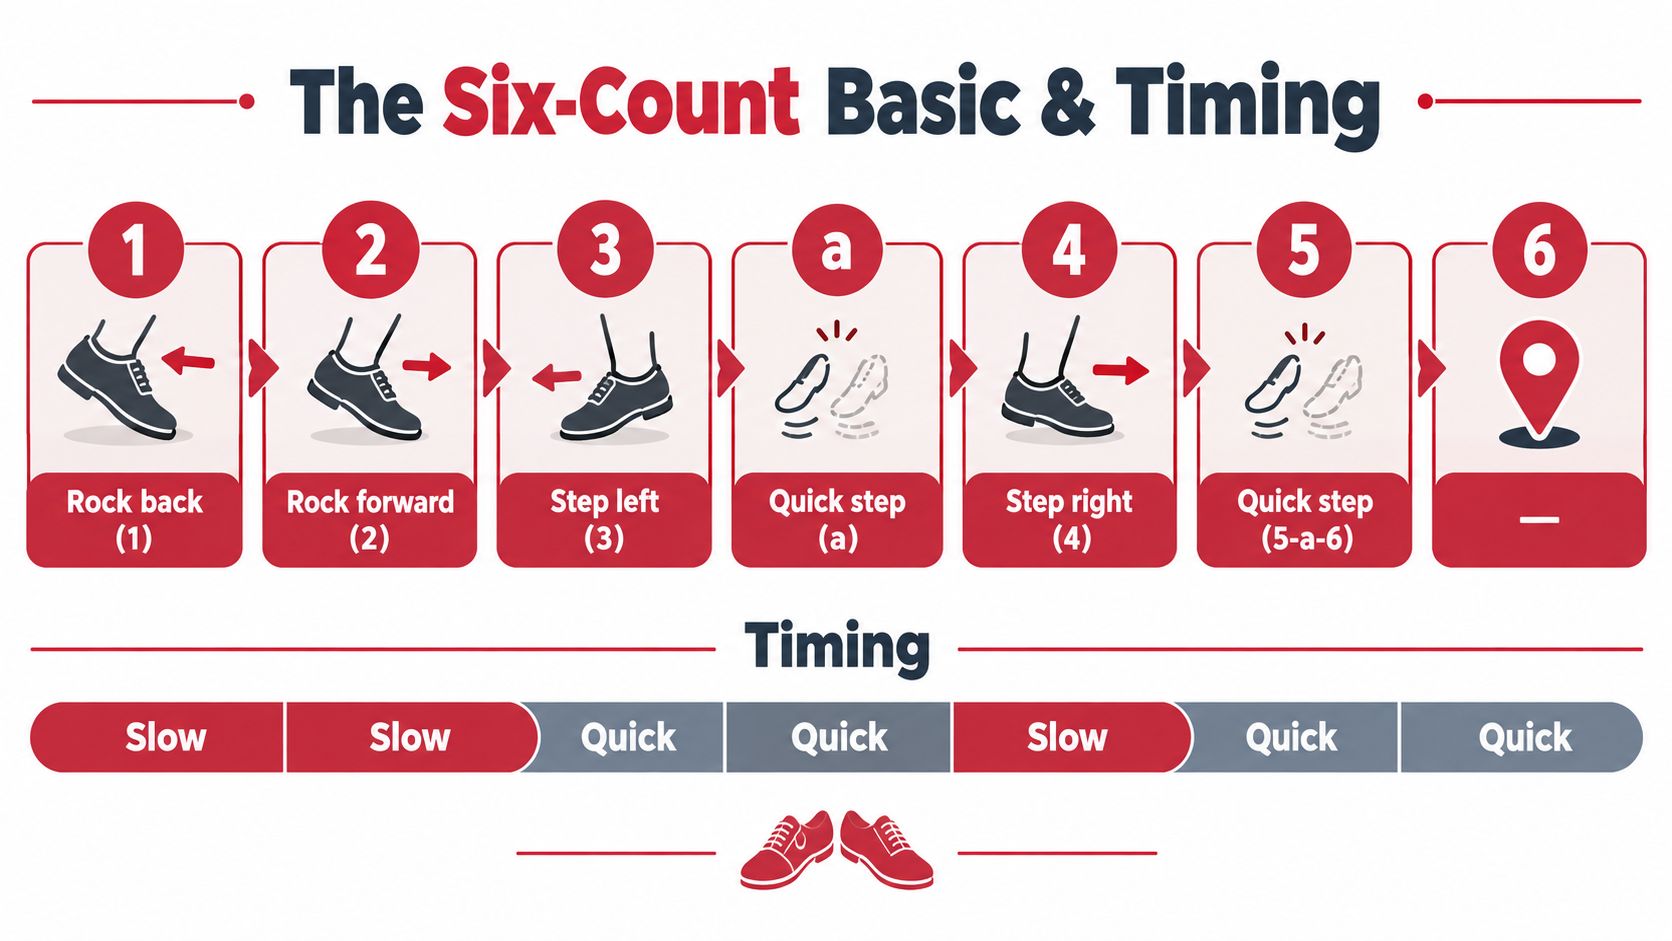
The beginner jive basic is built on 1-2-3-a-4-5-a-6. The first two counts belong to the rock step. The remaining counts create two compact chassés, each using a quick triple-step action. Jive timing is commonly taught in four-four music, with the six-count foot pattern expressed as 1a 2 3a 4 5 6 or 1-2-3-a-4-5-a-6. (Jive technique and timing reference)
Start without music. Say the count out loud and make the steps deliberately small.
Leader's footwork
For a leader, the basic works like this:
- Count 1, rock back. Step back with the left foot and transfer your weight lightly. Don't throw your whole body backward. Think of pressing into the floor while keeping your torso balanced.
- Count 2, replace. Return your weight to the right foot. This is the recovery from the rock, not a separate pause.
- Counts 3-a-4, side chassé. Step left, close the right foot toward the left, then step left again. The “a” is quick, so the middle step stays compact.
- Counts 5-a-6, side chassé. Step right, close the left foot toward the right, then step right again.
A useful verbal pattern is rock, replace, side-close-side, side-close-side. Keep your weight over the supporting foot after every step. If both feet feel equally weighted, you'll probably lose the speed and clarity that make the basic work.
Follower's footwork
For a follower, the pattern begins with the opposite direction:
- Count 1, rock back. Step back with the right foot.
- Count 2, replace. Recover weight to the left foot.
- Counts 3-a-4, side chassé. Travel right, close left, then step right.
- Counts 5-a-6, side chassé. Travel left, close right, then step left.
The direction changes between leader and follower allow the pair to remain balanced while facing each other. Both dancers still share the same rhythm and the same weight-transfer idea.
Practical rule: If the steps feel rushed, make them smaller before you try to move faster.
Body and arms
The rock step should feel like a slight back push on count 1 followed by a clean recovery on count 2. The chassés should travel side-close-side and back-close-back without dragging the feet or swinging the hips excessively.
Let your arms provide natural counterbalance. Don't pump them forcefully to manufacture energy. Your legs and weight changes create the rhythm, while relaxed arms help the movement look connected.
Practice the basic in place before adding turns, kicks, or styling. A beginner guide recommends building rhythm and weight changes before attempting large kicks, spins, or competition styling, with small steps and slow music supporting balance and control. (Beginner-safe jive progression)
Before practicing with music, review this guide to finding the beat in music. Then try a comfortable track and keep speaking the counts until your feet no longer need constant visual checking.
Partner Hold, Frame, and Connection
A solo basic teaches your feet, but partner dancing adds a conversation. Begin by asking someone clearly and courteously, then stand close enough to connect without crowding. In a traditional closed position, the follower stands near the leader's right shoulder, with both dancers facing each other and maintaining enough space for comfortable movement.
The classic hold has several parts:
- The leader places the right hand around the follower's mid-back.
- The partners join their other hands around eye level.
- Both dancers stand tall with elbows lifted but soft.
- Each person keeps a slight forward intention through the body, without leaning into the partner.
The frame is the shape you maintain with your own arms, shoulders, and torso. It shouldn't collapse when you step, and it shouldn't become rigid. Connection is the information shared through that frame, the joined hands, the leader's back hand, and subtle body movement.

Feeling the basic together
On count 1, both dancers move into the rock action while preserving the shape of the hold. The leader gives a clear but modest change of body direction, and the follower responds through the connection rather than guessing from the leader's arms.
On count 2, both partners replace their weight and return to a stable center. During the chassés, the joined hands and upper-body frame remain steady while the feet move quickly underneath. The connection should feel elastic, not locked.
A leader shouldn't shove the follower through the pattern. A follower shouldn't pull away to create movement. Use soft hands, maintain the frame, and allow the body to communicate before the arms add anything.
Small cues that improve partnership
Eye contact helps you stay present instead of staring at your feet. Matching the partner's low bounce makes the pair look unified, while matching the rhythm keeps the connection comfortable.
Try this exercise without music. Hold the frame, shift weight gently into the rock step, recover, and pause. If your partner can feel the direction without a tug, your connection is doing its job.
Common Beginner Mistakes and How to Fix Them
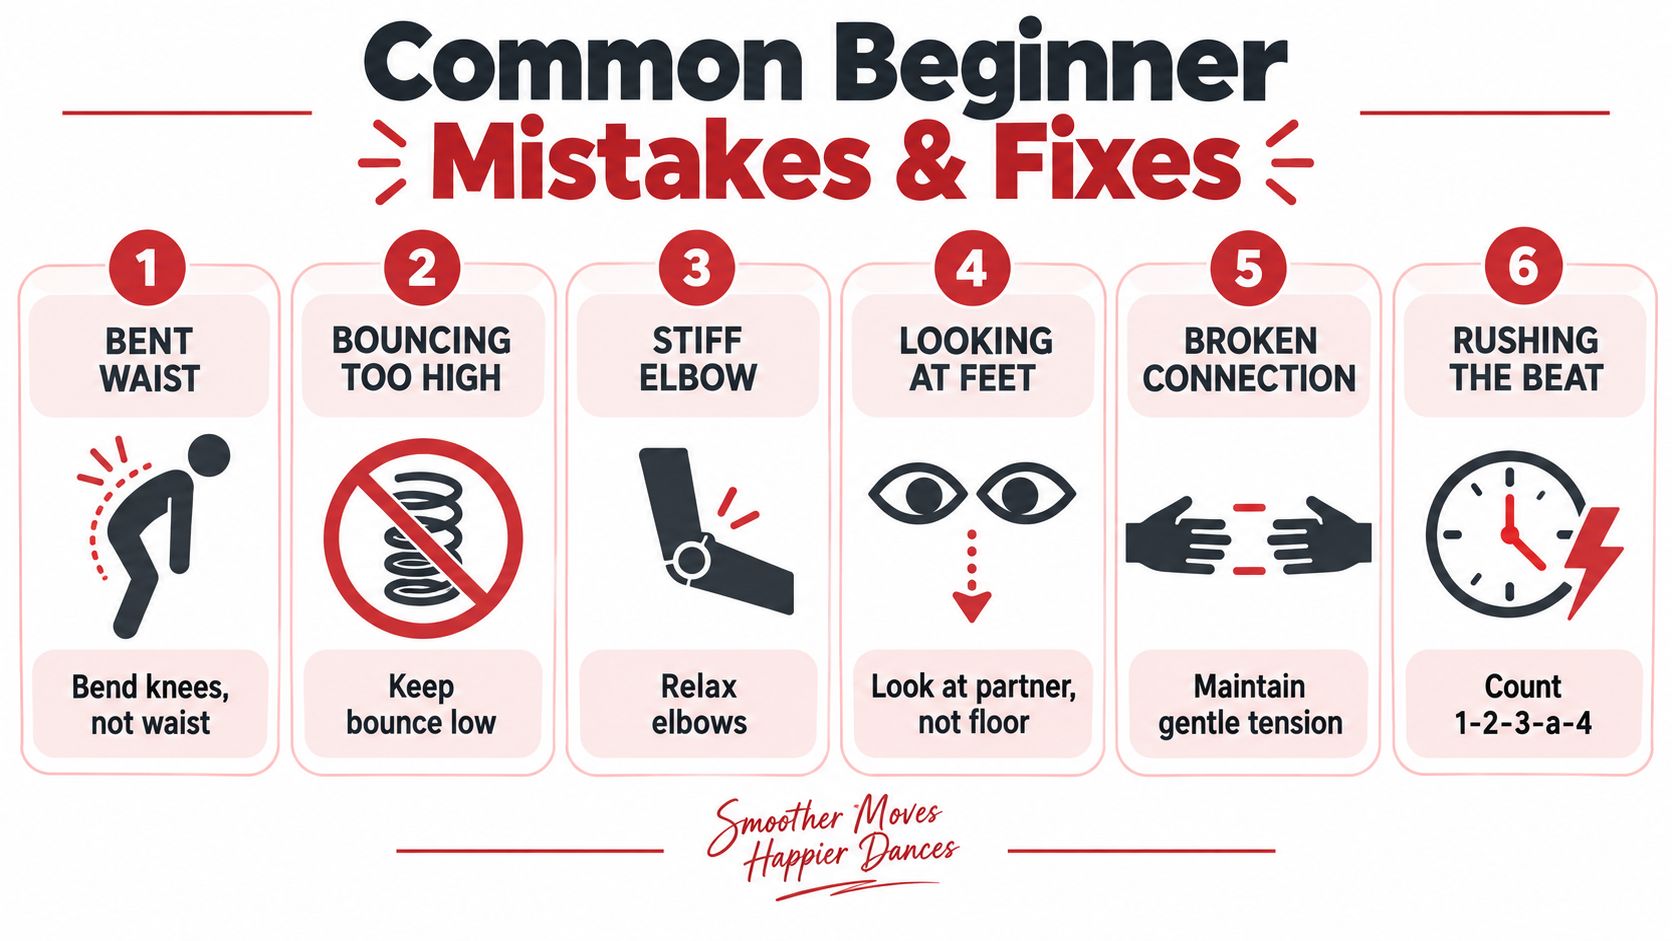
Most jive problems don't require more force. They usually require less movement, less tension, and clearer weight placement. Beginners often try to look energetic before they've made the rhythm dependable, which makes the dance feel harder than it is.
Bending at the waist
You may lean forward because the music feels fast or because you're trying to see your feet. That breaks your balance and makes partner connection uncomfortable.
Correction: Bend your knees, not your waist. Keep your sternum lifted and let your legs absorb the rhythm.
Bouncing too high
A large vertical bounce feels energetic, but it delays your weight changes and makes the chassés heavy.
Correction: Keep the bounce low. Imagine your head traveling along a smooth line while your knees soften underneath you.
Leading with the arms
Leaders sometimes pull with the joined hand or push with the back hand to make the follower move. Followers may also brace against those actions, creating stiffness.
Correction: Initiate direction through your body and let the arms preserve the frame. The hands should transmit information, not drag a partner around.
Stomping flat-footed
Putting the whole foot down heavily can make each step feel late. It also makes quick changes harder.
Correction: Place the feet lightly and keep the steps compact. Let the ball of the foot help you move quickly, then settle your weight clearly.
Looking at the floor
Watching your feet seems helpful, but it pulls your posture downward and removes visual communication.
Correction: Practice beside a mirror first, then look toward your partner. Use peripheral vision for the feet instead of dropping your head.
Holding too tightly
A tight embrace may feel safer, especially when you're unsure, but it restricts both dancers.
Correction: Keep a steady frame with relaxed elbows and gentle contact. Your partner should feel your direction without feeling squeezed.
Skipping the rock step
Some beginners rush directly into the chassés because those steps look more exciting. Without the rock step, the six-count phrase loses its anchor and partners can drift out of sync.
Correction: Say “rock, replace” clearly before adding “side-close-side.” If the pattern falls apart, return to the first two counts.
Before your next practice, check: Are your knees soft? Is your torso upright? Are your steps small? Can you count without looking down? Are your hands relaxed?
Mistakes are expected. When a step goes wrong, stop, identify the count where the weight changed incorrectly, and restart from there rather than repeating the entire sequence at speed.
Your First Week of Jive Practice
A useful first week alternates rhythm work with footwork and connection. Keep each session short enough that your concentration stays sharp. Begin with a gentle warm-up, practice one focused drill, then spend five minutes reviewing what felt stable and what needs attention.
The tempo guidance below is designed to keep early practice manageable. Beginner jive instruction commonly recommends starting near 130 BPM and progressing toward faster music as timing becomes more reliable. (Beginner jive tempo guidance)
| Tempo (BPM) | Difficulty Level | Suggested Songs |
|---|---|---|
| 120 to 130 | First attempts | “Rock Around the Clock”, “Hound Dog” |
| 130 to 140 | Comfortable beginner practice | “Johnny B. Goode”, suitable modern pop tracks |
| 145 to 160 | Developing control | Faster suitable modern pop tracks |
| Around 176 | Competition-speed challenge | Use only when the basic remains clean |
A simple seven-day sequence
Day 1, rhythm: Stand in place and clap the pulse. Speak 1-2-3-a-4-5-a-6, then add small knee bends without stepping.
Day 2, footwork: Practice the leader's or follower's basic slowly. Focus on placing your weight fully over each supporting foot.
Day 3, transfer: Repeat the basic beside a mirror. Freeze after counts 1, 2, 4, and 6 to check whether your body is balanced.
Day 4, partner connection: Add the closed hold with a partner. Practice the rock step and recovery without music, keeping the arms quiet.
Day 5, partner basic: Dance the complete six-count phrase to comfortable music. Stop whenever either partner loses the count, then restart slowly.
Day 6, review: Return to solo practice. Record yourself if possible and look for oversized steps, high bouncing, or a collapsing posture.
Day 7, gentle test: Dance several phrases at a manageable tempo. Don't add kicks or spins unless the basic stays rhythmical and balanced.
Use the advice in this guide to get better at dancing while you build consistency. You're ready for more advanced figures when you can keep the six-count rhythm without staring at your feet, recover calmly after a mistake, and maintain comfortable connection with a partner.
Why Taking a Class Makes Everything Click
Self-teaching can introduce the pattern, but it can also let small errors become habits. You may not notice that your rock step is too large, that your arms are initiating movement, or that your weight is never fully settling. A teacher can identify those details while you're dancing and give you one correction that immediately changes the way the step feels.
A guided beginner class also removes much of the uncertainty around partnership. At Danza Academy of Social Dance, a typical beginner experience can include a warm-up, a breakdown of the six-count basic, partner rotation, and gradual work with the rock step, chassé, and simple turns. Rotating partners gives you practice adapting to different heights, frames, timing habits, and communication styles.
Concerns that stop people from starting
“I don't have a partner.” You can still learn. Beginner classes commonly provide opportunities to work with other students, and partner rotation helps you understand the role you're practicing rather than depending on one familiar person.
“I'll be the slowest person there.” Everyone begins with a first class. A slower learner who listens carefully and maintains a clear count can progress more safely than someone who rushes into complicated styling.
“I'll feel embarrassed.” Your classmates are usually concentrating on their own feet and timing. A beginner-friendly environment treats mistakes as useful information, not as a performance failure.
For your first visit, wear comfortable clothing that allows your knees and hips to move. Choose shoes that stay securely on your feet and permit controlled movement, rather than slippery footwear that makes balance unpredictable. Bring water, arrive ready to ask questions, and tell the instructor that you're new to jive.
You can review the beginner dance lesson options before choosing the format that suits you. A complimentary introductory lesson gives you a practical way to experience the teaching style, ask about your goals, and practice the foundation with guidance.
Danza Academy of Social Dance offers welcoming instruction in ballroom, Latin, and social styles, including jive, with private lessons and group classes for beginners who want clear technique and relaxed partner connection. Visit Danza Academy of Social Dance to book your free complimentary lesson and take your first jive steps with an instructor who can help you build the rhythm correctly from the start.